CyberPanel ships with a DNS server, which lets you do following things:
Create Nameservers.
Create DNS Zone.
Delete Zone.
Add/Delete Records.
Create Name servers
There is a dedicated page which lets you create Name Servers. If you use this page to create name servers than DNS Zone for this domain will also be created.

This page is a simply utility to create name servers in a user friendly way. DNS zone for this domain will automatically be created, all you have to do is fill all the fields, example values can be:
- Domain Name:net
- First Nameserver:cyberpanel.net
- IP Address (First NS):168.100.1
- Second Nameserver:cyberpanel.net
- IPAddress (Second NS):168.100.2
After creating name servers on your server, you have to create or register glue records, you can read the article below for more information:
How to register private name servers with Namecheap or Godaddy!
After adding these records at your domain registrar, you can use following name servers with all your domains whose DNS is managed by your server.
- cyberpanel.net
- cyberpanel.net
Replace these with the one you created, after completing these steps you can create DNS Zones or Add/Delete records.
Create DNS Zone
Before you can use “ADD/MODIFY DNS Records” page you have to create DNS zone first, this is the first step to start using the DNS server.

Just enter the domain for which you want to control DNS Records on this server.
Add/Delete Records
Once DNS zone is created you can add or delete records using this page.

Currently Supported Records:
- A
- AAAA
- MX
- CNAME
- TXT
- SPF
- NS
How to add A record
Let see the configurations for adding A record for cyberpanel.net.

- From drop down select A.
- In the name box, you can either enter @or net, which means the same.
- Finally enter the IP to where this records should point to.
How to add MX Record
There are two step for adding MX record, for example, your mail server is at mail.cyberpanel.net, first you need to create an A record for this domain as defined above.
Once the A record is added you can add MXrecord.
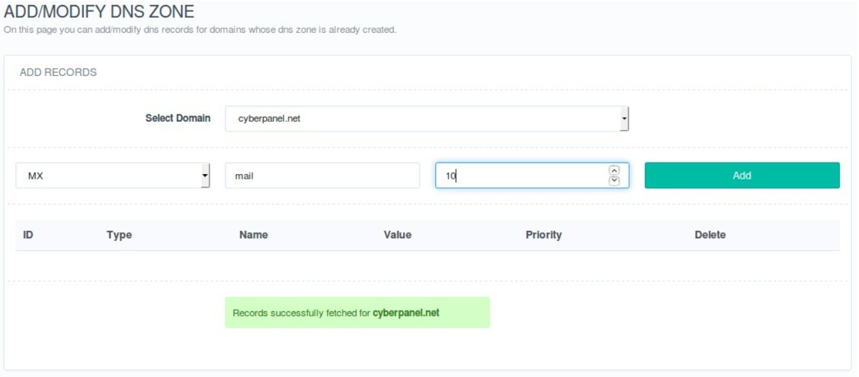
You can set the priority as required, after adding MX and A record your final configuration should look like:


